
This is a complaint I’ve heard often in my career. The project starts out fast and somewhere along the way it seems to take forever to get anything done. Sometimes the slow-down can be extreme. In one case it took over a year to deliver changes to some email templates. Often the actual time taken to do a piece of work far exceeds the initial estimate. Why does this happen? Is it because your engineers are fundamentally lazy? Are you being lied to? Is it something else?
To understand one way this deceleration happens, let’s start with a simple question:
How long does it take to make a peanut butter & jelly sandwich?
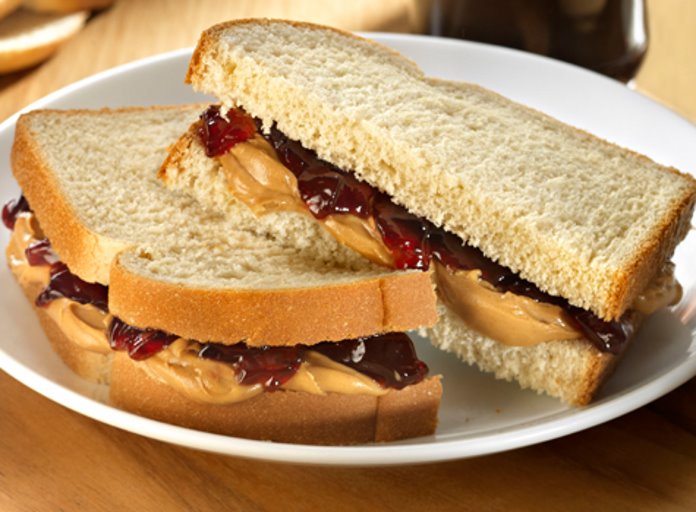
When I ask this question in presentations, the audience thinks I’m trying to trick them. “Do I have to bake the bread first? Harvest the peanuts?” It’s not a trick question. Seriously, how long does it take? My completely unscientific guess based on years of making PB&J’s is “about 5 minutes.” Most people are good with an answer in that range so it’s not worth arguing about. If your answer is 2 minutes or 10, it won’t change the point of this post.
So, now we’ve spent 5 minutes making a PB&J and another 5 or 10 enjoying the delicious flavors. Nom. Are we done? If this were a software project, the answer would be “yes” and we’d move on to preparing for the next meal. In our life we realize we need to put away the bread, peanut butter, and jelly. We need to wash our dishes and put them away. If the dishwasher is full we run it. If it’s clean we empty it. All of that takes extra time, but that’s the stuff we often don’t do in software engineering. The next meal is just more important.
This leaves our workspace messy.

Let’s refine the question: How long does it take to make a peanut butter & jelly sandwich in this kitchen? Obviously it will take longer. You’ll either have to spend time cleaning up first or scooching stuff out of the way so you can work. It gets harder to estimate how long the effort will take. You’ll run the risk of contaminating your sandwich with olive oil or spices you didn’t intend which means you may have to start over halfway through the effort.
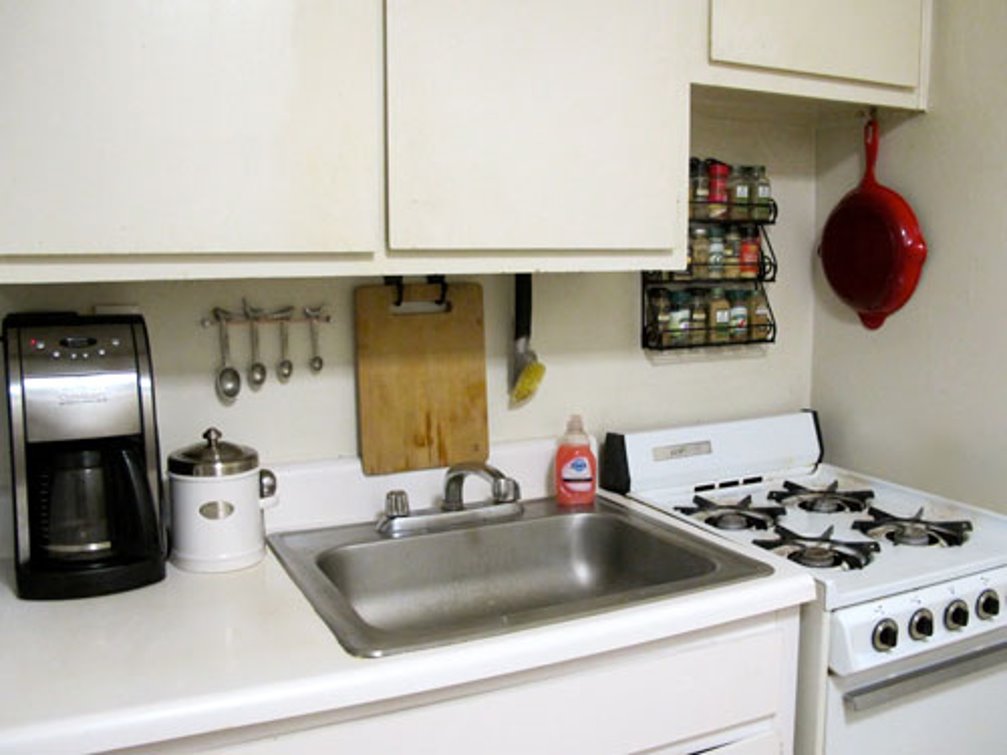
Now, imagine you defer this cleanup work to the hypothetical “later” as part of your standard operating procedure on your team. Then you end up in this kitchen:

How long would it take you to make a PB&J in this workspace? Imagine you’re not in the room–you’re just asking for a PB&J and the person making for you disappears for a long period of time. It would be exasperating. “What’s taking so long?” It would be worse because you would remember other ties where it only took 5 minutes. Perhaps you’re the manager that bought the double-oven, the cooking island, paid for the installation of all the cabinetry, and installed the large refrigerator. The team has the best tools and they can’t deliver!
At this point in a project engineers will start calling for rewrites. This is usually a mistake. The existing mess doesn’t go away while you’re building a new kitchen. Further, if you don’t change your engineering practices, your new kitchen will end up in the same condition in short order.
Let’s look at a clean workspace?
This is a much smaller kitchen with far fewer amenities than the previous one, bit it’s clean and organized. That takes time and effort but it makes everything else you do in this space faster.
Who’s to Blame?
All of us. Engineers often don’t want to do the cleanup and organizational work because it’s boring. Managers & PM’s don’t want engineers to spend time on it because they’re focused on delivering the next feature. But here’s the thing: code is an asset, but it’s also a liability. It helps you solve problems, but every line of code written creates new ones even if there are no bugs. Every line of code written has to be maintained in perpetuity. This process cannot be cheated. Essentially, we must clean our workspace every time we use it.
What Can We Do?
To Managers: you get what you incentivize for. Learn to see heroic fixes as failures. “Why were heroic efforts required in this case? How can we obviate the need for heroics?” Recognize and reward teams and individuals who work smoothly.
To PM’s: Make the health of your system a top-line metric. Maintain the health of your system before adding new features.
To Engineers: This may sound harsh, but do your job. This is your workspace. You’re the one living with these decisions on a day-to-day basis. Stop treating a cluttered kitchen as normal and learn communicate the importance of all of the work. Stop asking for permission to keep your workspace clean and just include that effort in your estimates! Learn to write effective automated tests–don’t just give up because it’s harder than it looks. Prioritize clean, communicative code over “clever” code. Think about failure modes and design for them.

Piping is probably one of the most underutilized feature of Powershell that I’ve seen in the wild. Supporting pipes in Powershell allows you to write code that is much more expressive than simple imperative programming. However, most Powershell documentation does not do a good job of demonstrating how to think about pipable functions. In this tutorial, we will start with functions written the “standard” way and convert them step-by-step to support pipes.
Here’s a simple rule of thumb: if you find yourself writing a foreach loop in Powershell with more than just a line or two in the body, you might be doing something wrong.
Consider the following output from a function called Get-Team:
Name    Value
----    -----
Chris   Manager
Phillip Service Engineer
Andy    Service Engineer
Neil    Service Engineer
Kevin   Service Engineer
Rick    Software Engineer
Mark    Software Engineer
Miguel  Software Engineer
Stewart Software Engineer
Ophelia Software Engineer
Let’s say I want to output the name and title. I might write the Powershell as follows:
$data = Get-Team
foreach($item in $data) {
    write-host "Name: $($item.Name); Title: $($item.Value)"
}
I could also use the Powershell ForEach-Object function to do this instead of the foreach block.
# % is a short-cut to ForEach-Object
Get-Team | %{
    write-host "Name: $($_.Name); Title: $($_.Value)"
}
This is pretty clean given that the foreach block is only one line. I’m going to ask you to use your imagination and pretend that our logic is more complex than that. In a situation like that I would prefer to write something that looks more like the following:
Get-Team | Format-TeamMember
But how do you write a function like Format-TeamMember that can participate in the Piping behavior of Powershell? There is documenation about this, but it is often far from the introductory documentation and thus I have rarely seen it used by engineers in their day to day scripting in the real world.
The Naive Solution
Let’s start with the naive solution and evolve the function toward something more elegant.
Function Format-TeamMember() {
    param([Parameter(Mandatory)] [array] $data)
    $data | %{
        write-host "Name: $($_.Name); Title: $($_.Value)"
    }
}

# Usage
$data = Get-Team
Format-TeamMember -Data $Data
At this point the function is just a wrapper around the foreach loop from above and thus adds very little value beyond isolating the foreach logic.
Let me draw your attention to the $data parameter. It’s defined as an array which is good since we’re going to pipe the array to a foreach block. The first step toward supporting pipes in Powershell functions is to convert list parameters into their singular form.
Convert to Singular
Function Format-TeamMember() {
    param([Parameter(Mandatory)] $item)
    write-host "Name: $($item.Name); Title: $($item.Value)"
}

# Usage
Get-Team | %{
    Format-TeamMember -Item $_
}
Now that we’ve converted Format-TeamMember to work with single elements, we are ready to add support for piping.
Begin, Process, End
The powershell pipe functionality requires a little extra overhead to support. There are three blocks that must be defined in your function, and all of your executable code should be defined in one of those blocks.
Beginfires when the first element in the pipe is processed (when the pipe opens.) Use this block to initialize the function with data that can be cached over the lifetime of the pipe.Processfires once per element in the pipe.Endfires when the last element in the pipe is processed (or when the pipe closes.) Use this block to cleanup after the pipe executes.
Let’s add these blocks to Format-TeamMember.
Function Format-TeamMember() {
    param([Parameter(Mandatory)] $item)

    Begin {
        write-host "Format-TeamMember: Begin" -ForegroundColor Green
    }
    Process {
        write-host "Name: $($item.Name); Title: $($item.Value)"
    }
    End {
        write-host "Format-TeamMember: End" -ForegroundColor Green
    }
}

# Usage
Get-Team | Format-TeamMember

#Output
cmdlet Format-TeamMember at command pipeline position 2
Supply values for the following parameters:
item:
Oh noes! Now Powershell is asking for manual input! No worries–There’s one more thing we need to do to support pipes.
ValueFromPipeLine… ByPropertyName
If you want data to be piped from one function into the next, you have to tell the receiving function which parameters will be received from the pipeline. You do this by means of two attributes: ValueFromPipeline and ValueFromPipelineByPropertyName.
ValueFromPipeline
The ValueFromPipeline attribute tells the Powershell function that it will receive the whole value from the previous function in thie pipe.
Function Format-TeamMember() {
    param([Parameter(Mandatory, ValueFromPipeline)] $item)

    Begin {
        write-host "Format-TeamMember: Begin" -ForegroundColor Green
    }
    Process {
        write-host "Name: $($item.Name); Title: $($item.Value)"
    }
    End {
        write-host "Format-TeamMember: End" -ForegroundColor Green
    }
}

# Usage
Get-Team | Format-TeamMember

#Output
Format-TeamMember: Begin
Name: Chris; Title: Manager
Name: Phillip; Title: Service Engineer
Name: Andy; Title: Service Engineer
Name: Neil; Title: Service Engineer
Name: Kevin; Title: Service Engineer
Name: Rick; Title: Software Engineer
Name: Mark; Title: Software Engineer
Name: Miguel; Title: Software Engineer
Name: Stewart; Title: Software Engineer
Name: Ophelia; Title: Software Engineer
Format-TeamMember: End
ValueFromPipelineByPropertyName
This is great! We’ve really moved things forward! But we can do better.
Our Format-TeamMember function now requires knowledge of the schema of the data from the calling function. The function is not self-contained in a way to make it maintainable or usable in other contexts. Instead of piping the whole object into the function, let’s pipe the discrete values the function depends on instead.
Function Format-TeamMember() {
    param(
        [Parameter(Mandatory, ValueFromPipelineByPropertyName)] [string] $Name,
        [Parameter(Mandatory, ValueFromPipelineByPropertyName)] [string] $Value
    )

    Begin {
        write-host "Format-TeamMember: Begin" -ForegroundColor Green
    }
    Process {
        write-host "Name: $Name; Title: $Value"
    }
    End {
        write-host "Format-TeamMember: End" -ForegroundColor Green
    }
}

# Usage
Get-Team | Format-TeamMember

# Output
Format-TeamMember: Begin
Name: Chris; Title: Manager
Name: Phillip; Title: Service Engineer
Name: Andy; Title: Service Engineer
Name: Neil; Title: Service Engineer
Name: Kevin; Title: Service Engineer
Name: Rick; Title: Software Engineer
Name: Mark; Title: Software Engineer
Name: Miguel; Title: Software Engineer
Name: Stewart; Title: Software Engineer
Name: Ophelia; Title: Software Engineer
Format-TeamMember: End
Alias
In our last refactoring, we set out to make Format-TeamMember self-contained. Our introduction of the Name and Value parameters decouple us from having to know the schema of the previous object in the pipeline–almost. We had to name our parameter Value which is not really how Format-TeamMember thinks of that value. It thinks of it as the Title–but in the context of our contrived module, Value is sometimes another name that is used. In Powershell, you can use the Alias attribute to support multiple names for the same parameter.
Function Format-TeamMember() {
    param(
        [Parameter(Mandatory, ValueFromPipelineByPropertyName)] [string] $Name,
        [Alias("Value")]
        [Parameter(Mandatory, ValueFromPipelineByPropertyName)] [string] $Title # Change the name to Title
    )

    Begin {
        write-host "Format-TeamMember: Begin" -ForegroundColor Green
    }
    Process {
        write-host "Name: $Name; Title: $Title" # Use the newly renamed parameter
    }
    End {
        write-host "Format-TeamMember: End" -ForegroundColor Green
    }
}

# Usage
Get-Team | Format-TeamMember

# Output
Format-TeamMember: Begin
Name: Chris; Title: Manager
Name: Phillip; Title: Service Engineer
Name: Andy; Title: Service Engineer
Name: Neil; Title: Service Engineer
Name: Kevin; Title: Service Engineer
Name: Rick; Title: Software Engineer
Name: Mark; Title: Software Engineer
Name: Miguel; Title: Software Engineer
Name: Stewart; Title: Software Engineer
Name: Ophelia; Title: Software Engineer
Format-TeamMember: End
Pipe Forwarding
Our Format-TeamMember function now supports receiving data from the pipe, but it does not return any information that can be forwarded to the next function in the pipeline. We can change that by returning the formatted line instead of calling Write-Host.
Function Format-TeamMember() {
    param(
        [Parameter(Mandatory, ValueFromPipelineByPropertyName)] [string] $Name,
        [Alias("Value")]
        [Parameter(Mandatory, ValueFromPipelineByPropertyName)] [string] $Title # Change the name to Title
    )

    Begin {
        # Do one-time operations needed to support the pipe here
    }
    Process {
        return "Name: $Name; Title: $Title" # Use the newly renamed parameter
    }
    End {
        # Cleanup before the pipe closes here
    }
}

# Usage
[array] $output = Get-Team | Format-TeamMember
write-host "The output contains $($output.Length) items:"
$output | Out-Host

# Output
The output contains 10 items:
Name: Chris; Title: Manager
Name: Phillip; Title: Service Engineer
Name: Andy; Title: Service Engineer
Name: Neil; Title: Service Engineer
Name: Kevin; Title: Service Engineer
Name: Rick; Title: Software Engineer
Name: Mark; Title: Software Engineer
Name: Miguel; Title: Software Engineer
Name: Stewart; Title: Software Engineer
Name: Ophelia; Title: Software Engineer
Filtering
This is a lot of information. What if we wanted to filter the data so that we only see the people with the title “Service Engineer?” Let’s implement a function that filters data out of the pipe.
function Find-Role(){
    param(
        [Parameter(Mandatory, ValueFromPipeline)] $item,
        [switch] $ServiceEngineer
    )

    Begin {
    }
    Process {
        if ($ServiceEngineer) {
            if ($item.Value -eq "Service Engineer") {
                return $item
            }
        }

        if (-not $ServiceEngineer) {
            # if no filter is requested then return everything.
            return $item
        }

        return; # not technically required but shows the exit when nothing an item is filtered out.
    }
    End {
    }
}
This should be self-explanatory for the most part. Let me draw your attention though to the return; statement that isn’t technically required. A mistake I’ve seen made in this scenario is to return $null. If you return $null it adds $null to the pipeline as it if were a return value. If you want to exclude an item from being forwarded through the pipe you must not return anything. While the return; statement is not syntactically required by the language, I find it helpful to communicate my intention that I am deliberately not adding an element to the pipe.
Now let’s look at usage:
Get-Team | Find-Role | Format-Data # No Filter
Name: Chris; Title: Manager
Name: Phillip; Title: Service Engineer
Name: Andy; Title: Service Engineer
Name: Neil; Title: Service Engineer
Name: Kevin; Title: Service Engineer
Name: Rick; Title: Software Engineer
Name: Mark; Title: Software Engineer
Name: Miguel; Title: Software Engineer
Name: Stewart; Title: Software Engineer
Name: Ophelia; Title: Software Engineer

Get-Team | Find-Role -ServiceEngineer | Format-TeamMember # Filtered
Name: Phillip; Title: Service Engineer
Name: Andy; Title: Service Engineer
Name: Neil; Title: Service Engineer
Name: Kevin; Title: Service Engineer
Summary
Notice how clean the function composition is: Get-Team | Find-Role -ServiceEngineer | Format-TeamMember!
Pipable functions are a powerful language feature of Powershell <rimshots/>. Writing pipable functions allows you to compose logic in a way that is more expressive than simple imperative scripting. I hope this tutorial demonstrated to you how to modify existing Powershell functions to support pipes.

There doesn’t seem to be much guidance as to the internal structure of a Powershell module. There’s a lot of “you can do it this way or that way” guidance, but little “this has worked well for me and that hasn’t.” As a patterns and practices guy, I’m dissatisfied with this state of affairs. In this post I will describe the module structure I use and the reasons it works well for me.
I’ve captured the structure in a sample module for you to reference.

Posh.psd1
This is a powershell module manifest. It contains the metadata about the powershell module, including the name, version, unique id, dependencies, etc..
It’s very important that the Module id is unique as re-using a GUID from one module to another will potentially create conflicts on an end-user’s machine.
I don’t normally use a lot of options in the manifest, but having the manifest in place at the beginning makes it easier to expand as you need new options. Here is my default psd1 implementation:
# Version number of this module.
ModuleVersion = '1.0'

# Supported PSEditions
# CompatiblePSEditions = @()

# ID used to uniquely identify this module
GUID = '2a97124e-d73e-49ad-acd7-1ea5b3dba0ba'

# Author of this module
Author = 'chmckenz'

# Company or vendor of this module
CompanyName = 'ISG Inc'

# Copyright statement for this module
Copyright = '(c) 2018 chmckenz. All rights reserved.'

ModuleToProcess = "Posh.psm1"
Posh.psm1
This is the module file that contains or loads your functions. While it is possible to write all your module functions in one file, I prefer to separate each function into its own file.
My psm1 file is fairly simple.
gci *.ps1 -path export,private -Recurse | %{
. $_.FullName
}

gci *.ps1 -path export -Recurse | %{
Export-ModuleMember $_.BaseName
}
The first gci block loads all of the functions in the Export and Private directories. The -Recurse argument allows me to group functions into subdirectories as appropriate in larger modules.
The second gci block exports only the functions in the Export directory. Notice the use of the -Recurse argument again.
With this structure, my psd1 & psd1 files do not have to change as I add new functions.
Export Functions
I keep functions I want the module to export in this directory. This makes them easy to identify and to export from the .psm1 file.
It is important to distinguish functions you wish to expose to clients from private functions for the same reason you wouldn’t make every class & function public in a nuget package. A Module is a library of functionality. If you expose its internals then clients will become dependent on those internals making it more difficult to modify your implementation.
You should think of public functions like you would an API. It’s shape should be treated as immutable as much as possible.
Private Functions
I keep helper functions I do not wish to expose to module clients here. This makes it easy to exclude them from the calls to Export-ModuleMember in the .psm1 file.
Tests
The Tests directory contains all of my Pester tests. Until a few years ago I didn’t know you could write tests for Powershell. I discovered Pester and assigned a couple of my interns to figure out how to use it. They did and they taught me. Now I can practice TDD with Powershell–and so can you.
Other potential folders
When publishing my modules via PowershellGallery or Chocolatey I have found it necessary to add additional folders & scripts to support the packaging & deployment of the module. I will follow-up with demos of how to do that in a later post.
Summary
I’ve put a lot of thought into how I structure my Powershell modules. These are my “best practices,” but in a world where Powershell best practices are rarely discussed your mileage may vary. Consider this post an attempt to start a conversation.
There are four basic engineering aspects to developing a software system: Requirements, Test, Design, and Implementation. When a project is squeezed for time, it is the Design and Test aspects that get squeezed to make room for Implementation. Design activities are in effect frozen, which means that the design of the system will stay static even as new features are added. Testing simply stops, with all that that implies.
As implementation continues, new requirements are uncovered or areas of existing requirements are discovered to need modification or clarification. All of these factors imply necessary changes to the design of the system, but since design is frozen, the necessary changes don’t happen. Since testing isn’t happening, the full ramifications of this fact are not immediately felt.
The only remaining implementation choice is to squeeze square pegs of new features into the round holes of the existing design. This option requires more time to implement because time is spent creating overhead to deal with the dissonance between the design and the requirements. The resulting code is harder to understand because of the extra overhead. This option is more prone to error because more code exists than should be necessary to accomplish the task. Every additional line of code is a new opportunity for a bug.
All of these factors results in code that is harder to maintain over time. New features are difficult to implement because they will require the same kind of glue-code to marry a poor design to the new requirements. Further, each new feature deepens the dependency of the system on the poor design, making it harder to correct, and making it ever-easier to continue throwing bad code after bad. When considered in isolation, it will always seem cheaper to just add crap-code to get the new feature in rather than correct the design, but cumulatively, it costs much more. Eventually it will kill the project.
As bad as all this is, the problems don’t stop there. As long as the ill-designed code continues to exist in the system it serves to undermine the existing and all future features in two ways. 1) It becomes a pain point around which ever more glue-code will have to be written as the interaction of the ill-designed feature with the rest of the system changes. 2) it acts as a precedent in the code-base, demonstrating that low-quality code is acceptable so long as the developer can find a reason to rationalize it.
